Showing posts with label beef. Show all posts

Saturday, January 14, 2012

Sloppy Joes

Sloppy Joes, okay I know when you read that title you thought "everyone knows how to make these".  Everyone may but we all make them just a little bit different.  What brought me to write about them and share my recipe is because on Wednesday I received a text from Aimee asking what I put in my sloppy joes.  I preceded to share with her as detailed as you can with a text what I put in my sloppy joes.  And than decided to make them for dinner.

Whenever I make sloppy joes I think of my brother Curtis.  My "recipe" is from him.  I don't even know what I used to make before.  I just remember one time helping him prepare dinner and this is what we made and these are the ingredients he had me use and how to cook them.

Ingredients:  for 2 people  (adjust according to how many you are serving)

1/3 lb. ground beef
1/4 yellow onion - diced as small as you like
8 oz. tomatoe sauce
garlic salt to taste - probably about 1/2 tsp.
1 TBS yellow mustard
1/4 to 1/2 cup of your favorite BBQ sauce (depending on how tangy you want it)
1/4 to 1/2 cup of brown sugar (depending on how sweet you want it)

That's all, I don't add catsup, Worcestershire sauce, vinegar, or other ingredients but I know some of you have a recipe that calls for those items.

Directions:

In a skillet break up your ground beef and add your onions.  Cook/saute until the ground beef is thoroughly brown  and the onions are transparent (this was the secret Curtis shared with me, if you cook the onions to transparency the flavor is just right and the little guys are not crunchy - so I think about Curtis while I am doing this).  While you are cooking the ground beef, break it up with a spatula to little, little pieces (unless you like bite size chunks of ground beef in your sloppy joes)

You can see I am not picky about onion size

Add the rest of the ingredients; in the order listed.  It probably doesn't matter that much what order but I would definitely do the tomato sauce first to have sauce to add the rest too. 


About 1 TBS of mustard
Take a little taste of the brown sugar before putting it away, its that good.

 Simmer until it is the right thickness about 10 minutes.

Serve on a hamburger bun or kaiser roll (because that is what we had)
If you are my husband, add miracle whip or mustard to your bun
Eat and enjoy


If you want to know a little more about my brother Curtis Brinkman - google him


Sunday, December 11, 2011

Taco Soup

As I'm sitting here trying to think of what to write as a prelude to this delicious recipe, my mind is blank. And I'm realizing that some of you might not even read the stuff I write in each blog post. You might just be here for the recipe. And there is absolutely nothing wrong with that.

I know I've said it before, but this blog started out as a way for me to keep track of my favorite recipes, and for my mom and I to share recipes that we like with each other. And I still write on that blog for that purpose. I love having my favorite recipes saved on here. And when I don't know what to make for dinner I love being able to look at my own food blog, and knowing that I have loved all of the recipes I've posted on here, and therefor any recipe I choose will be delicious.

As Ron Swanson would say "You may have thought you heard me say I wanted a lot of bacon and eggs, but what I said was: Give me all the bacon and eggs you have.". (Any other Parks and Rec lovers out there? ) What I'm afraid you heard me say is that I only blog to keep track of my recipes, but what I actually said was I love having my recipes saved on here. And that doesn't mean I don't love having readers too.

We are growing, people. Slowly, but surely the blog is growing. And I want to know what you think. So spill the beans. Please?!!!! Do you like the recipes we post? Do you want more crock pot recipes, more dessert recipes, more chicken recipes, etc. Have you tried our recipes? How did they turn out? What did you change? What did you like? Dislike? Do you like reading about our lives too? Do you like our silly stories about making a recipe? Or inspirations? Or what? Speak to me. We've got a lot of followers, and I want to know YOU. So tell me about yourself, share 7 random things about you, like we did here. And post them in a comment, or a link to it.

The recipe I am going to share today, is actually one of the first recipes I ever posted on this blog. Back in the day when the recipe was only read by mother and I. But back then I didn't take pictures, and this is such a simple and delicious recipe that I have to share it again.

Taco Soup
1 lb ground beef
one can of corn
one can of beans (black or pinto)

1 cup salsa
1 14 oz can stewed tomatoes(or tomato sauce)


tortilla chips
toppings (sour cream, shredded cheese, cilantro, guacamole, etc.)


1. Combine ground beef, corn, beans, taco seasoning, salsa and tomatoes in a crock pot.
2. Stir together.
3. Cook on low for about 6 hours, or on high for 3.
4. Top with desired toppings and tortilla chips.

Enjoy.


Featured on

Tuesday, November 29, 2011

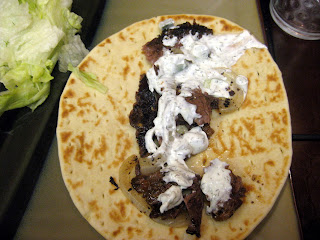
Balsamic Glazed Steak with Caramelized Onions

I don't use balsamic vinegar very often, even though we have it in a nice decorative bottle next to our olive oil to readily pour out. But when I do use it, this is one of my favorite recipes to use it for. Plus, this recipe calls for caramelized onions, which I could pop into my mouth plain, like real pieces of caramel. So, that's a total plus, right?

So when reducing balsamic vinegar, or maybe balsamic vinegar is always like this, it sends its aroma throughout the house. The smell is so strong, that if you put your head over the pot and smell directly, you might end up having a cough attack as the vinegar literally attacks your nose. But, it tastes good, so its alright. Just don't breathe the fumes in directly.

We made this recipe once before, a while back, but made the mistake of cutting our meat pre-grilling it. It was still pretty good, but this time it was much better.  Because before the meat was a little dry and tough, and this time it was moist and succulent and delicious.


2/3 cup balsamic vinegar
1 onion, sliced
1 TBS olive oil
1 tsp salt
1 lb steak (flank, if you have it) **
Worcestershire sauce
Lemon pepper dressing
6 small pitas ***

**Ours was 1 lb, but cut into thirds
***We had it this time on pitas, but the meat and onions taste good by themselves as well.

1. Preheat charcoal, gas or electric grill.
2. Drizzle Worcestershire sauce onto steak pieces, and rub in.
3. Marinade steak pieces in lemon pepper dressing for 15-20 minutes
4. In a small sauce pan, bring balsamic vinegar to a boil.
5. Reduce heat to medium low and simmer until vinegar is reduced to about 1/4 cup, this will take about 5 minutes.
6. Heat olive oil in a large skillet over medium high heat.
7. Add onions to hot oil, and sprinkle with salt.
8. Saute onions, stirring occasionally until golden brown, or about 22 minutes.
9. Grill steak about 5-6 minutes on each side, or until it reaches desired doneness.****
10. When steak is done, cut into thin strips (about 1/4 inch.
11. Place 3-4 strips of meat onto one pita, top with onions and drizzle with vinegar sauce.
12. Enjoy!

****Measure how done the steak is with a thermometer, here are some tips on the correct temperatures for meat. My recommendation is 140 for this steak, or medium done.

Mmmm, this was so good. I hope you enjoy this as much as we did. Funnily enough we had this with a side of leftover green bean casserole (from Thanksgiving). It was perfect. ;)

Recipe inspired by My Recipes.

Saturday, November 26, 2011

Three Cheese Manicotti with Meat Sauce

Nate and I were discussing Italian food. First, we absolutely love it. All of it. But second, what about all the different types of pasta noodles? I'm pretty sure the Italians were just trying to trick us into thinking that the different noodles taste different. I mean come on, really, what is the REAL difference of rigatoni and penne noodles. I know, I know, one is cut diagonally and the other straight, but what is the PURPOSE of this difference.  If I were to have a taste of each, blindfolded I wouldn't be able to name which was which.Or even angel hair, vs spaghetti, vs linguine, vs fettuccine. And why does alfredo sauce have to be eaten with fettuccine noodles?

Manicotti. I'm pretty sure that manicotti noodles are just large penne noodles.

Regardless of this trickery, I really do love Italian food. And I hope that you do too. Because I post a lot of Italian inspired recipes. And this is one of my favorites. So, I hope you enjoy this as much as we did.


Three Cheese Manicotti with Meat Sauce

14 oz diced tomatoes
14 oz crushed tomatoes
14 oz tomato sauce
1 lb ground beef
2 TBS olive oil
2 TBS garlic cloves
1/4 tsp red pepper
½ tsp salt
2 tsp basil
1/2 TBS oregano
1/2 TBS thyme
15 oz ricotta
1 cup parmesan (split)
8 oz mozzarella (split)
2 eggs
3.5 oz spinach, steamed
¾ tsp salt
¼ tsp pepper
1 ½ TBS parsley
1 tsp basil
12-14 manicotti shells

1. Heat olive oil in a large saute pan over medium heat.
2. Add garlic and ground red pepper to olive oil and heat 1 to 2 minutes.
3. Add ground beef to pan and brown.
4. Add diced and crushed tomatoes, tomato sauce, salt, basil, oregano and thyme to ground beef.
5. Bring to a simmer.
6. Simmer for 15-20 minutes.
7. Preheat oven to 350 degrees.
8. Bring a large pot of water to boil.
9. Add manicotti noodles and cook for about 5 minutes, until al dente.
10. Meanwhile in a large bowl combine ricotta, 1/2 cup parmesan, 1 cup mozzarella (4 oz), eggs, spinach, salt, pepper, parsley, and basil.
11. When noodles are cooked, allow them to cool for about 5 minutes.
12. Spread about 2 cups of sauce into the bottom of a 9x13 inch baking dish.
13. Completely fill noodles with cheese mixture.
14. Place noodles into the sauced pan, however you think they fit best.
15. Cover noodles with the remainder of the sauce.
16. Cover pan with foil and bake about 40 minutes in preheated oven.
17. Remove foil and sprinkle manicotti with remaining 1/2 cup of parmesan and 1 cup of mozzarella.
18. Bake an additional 8-10 minutes until cheese is golden brown and bubbly.
19. Remove and allow to cool for about 10 minutes before serving.


The steps of this dish do not have to be done in this exact order, you can prepare the cheese mixture first. You can also make this meatless, or you (of course) use store bought sauce, whatever you like.

This was delicious and we decided to freeze about half of the pan, so hopefully in a month or so we'll have some delicious manicotti for dinner. Yum.


What is your favorite type of pasta noodle?


Featured on

Wednesday, August 31, 2011

Homemade Red Pepper Beef Ravioli

Red Pepper Beef Ravioli

1 lb beef roast
2 cups chicken broth
1 TBS oregano
1/2 TBS thyme
1 and 1/2 medium sized red peppers (or 1 large)
1 cup Parmesan cheese
1 TBS garlic salt

Special Equipment Needed:  Kitchen Aid meat grinder attachment

1. Put beef, chicken broth, oregano and thyme in the crock pot.
2. Cook on low for 6 hours, high for 4 hours.
3. Send meat through your meat grinder using the coarse setting.
4. Send meat through again on the fine setting, adding sliced red peppers this time.
5. In a large bowl combine meat mixture, parmesan cheese and garlic salt.
6. Either using the pasta roller attachment or a rolling pin, roll the dough out into long strips, about 4-5 inches wide and as long as you can make them.

7. You will need two strips that are the approximately the same length and width.
8. Take approx. 1 TBS of meat mixture and space about 1 inch apart on one strip of dough. 


9. Place the other strip of dough on top.
10. Cut and seal the raviolis using a pastry cutter.
  
11. Set raviolis aside to dry for about 30 minutes.
12. Boil a large pot of water.
13. Put raviolis in boiling water and cook for about 8 minutes.
14. Enjoy raviolis topped with your favorite tomato marinara sauce (canned or homemade) and some mozzarella cheese.


This was seriously so yummy

Although next time we'll probably make the raviolis a little smaller. When making this I would recommend making your raviolis about 1x1 inches. But bigger is okay, they'll just get more air in them and might pop while boiling in the water.

We can't wait to make other variations of homemade ravioli soon.

What is your favorite kind of ravioli?

Featured on

Tuesday, July 19, 2011

Meatball Marinara Sandwich

I saw a version of this recipe here, from the Pioneer Woman and decided it looked to delicious not to try it for ourselves. I slightly adapted the recipe to make it more my own, and also decided we might as well eat the sandwiches on deli buns, instead of eating 3 or 4 dinner rolls. Either way, this turned out really tasty.


1 lb ground beef
1/2 cup Italian flavored bread crumbs
1/2 cup milk
1 1/2 TBS garlic
1/2 tsp salt
1/4 tsp pepper
2 TBS olive oil
1/4 of an onion, chopped
16 oz marinara sauce **

**You can use a jar of sauce, or make your own. I chose to make my own similar to this recipe, but I left out the salt, pepper and garlic since the meatballs had so much flavor already.

deli rolls
mozzarella cheese, shredded


1. Put ground beef, bread crumbs, garlic, salt, pepper and milk in a large bowl.
2. Knead together with hands, mixing thoroughly.
3. Roll meat into tablespoon sized balls.
3. Meanwhile, heat olive oil in a large pan over medium heat.
4. Add onions and saute for 1 minute.
5. Add meatballs between the onions and brown for 1 minute. (I had to do this in 2 batches).
6. Flip meatballs over carefully and brown for 1 minute.
7. Pour marinara sauce into the pan.
8. Put lid on pan and shake gently to mix.
9. With lid on pan, allow sauce to simmer for 20 minutes.
10. After 20 minutes, cut deli rolls open in the middle.
11. Put about 6 meatballs on each roll, with extra sauce.
12. Top meatballs with desired amount of mozzarella cheese.
13. Eat immediately and enjoy!


This makes enough for about 4 sandwiches. We each had one sandwich and we were still a LITTLE hungry, (especially Nate because he only had eaten plums for breakfast/lunch). So Nate asked if I would share one with him. I told him I wanted less than half, but he told me I had to eat half. Anyway, we had a good amount of sauce left over and a few meatballs (which would have been perfect to freeze, and enjoy on pasta later). But I forgot. And we went to Lowe's to get a light bulb, and then to get dessert and it sat on the counter the whole time. So needless to say, our dog, Aspen, enjoyed some of it this morning on top of his breakfast (of dog food of course). Lesson learned. Put leftovers in the fridge right away, because it really is a shame to waste them.
What's your worst story of accidentally wasting food?

Tuesday, June 28, 2011

Copycat - Chili Cheese Hamburger Helper

Although I will admit that I actually do like boxed hamburger helper, with all the preservatives in it, it really isn't very good for me. And one day when Nate and I were trying to think of what to make for dinner, he came upon this recipe. So we tried it. The first time we made it we even made home made noodles to go in it, making it almost completely homemade (now I just need to grind my own beef, and grown my own spices --- we do have parsley, chives and basil growing in a little pot inside)

Anyway, this is the second time we made it and it was delicious. Maybe it was because we were starving, or maybe because we were camping. But it was good. And if you (or your kids) like hamburger helper you should try it too.

1 lb ground beef
1 1/2 cup water
1 1/2 cups milk
1 1/2 cups macaroni noodles
1 TBS cornstarch
1 TBS chili pwder
1 tsp garlic powder
1 tsp salt
1 tsp sugar
1/2 tsp paprika
1 cup cheddar cheese, shredded

We cooked this in a pot on the stove the first time, but in a dutch oven the second time. The directions are basically the same.
1.  Brown ground beef in a large pot.
2. Once cooked, drain the fat.
3. Add water and milk and spices (spices can be combined prior to making this, or at this point)
4. Stir every couple of minutes until boiling.
5.  Once boiling add noodles.
6. Cover and simmer for about 10 minutes (until noodles are cooked), stirring occasionally.
7. In the last few minutes of cooking add the cheese.
8. Stir in the cheese and recover the pot for the final couple minutes of cooking.
9. Once noodles are soft, take the pot of the heat and uncover and let stand for a few minutes, to thicken.

Enjoy. 


I liked mine topped with a little ketchup, but that's what I do with the boxed stuff too. This was mighty tasty.

What pre-prepared meals can YOU not live without? Frozen, boxed, etc.

Friday, June 24, 2011

Ground Beef Nachos

This was a very spontaneous meal one evening when we got "late night munchies". Nate said he wanted nachos, and I wondered how we could make our own nacho cheese (I LOVE the nacho cheese you buy in jars). We found this recipe and tweaked it a little for our liking. We made some ground beef to go with it. And wah-la (how would you spell that?) it was delicious.

Nate said this nacho cheese was perfect, though I think it still could use a little more flavor. With the flavored beef and the salsa it all came together to be very tasty though.

Nacho Cheese
2 TBS butter
2 TBS flour
1 cup milk
8 oz shredded cheese (we used cheddar)
1/2 tsp salt
1 small can of diced green chiles

1. In a sauce pan melt butter over medium heat.
2. Stir in flour.
3. Stir in milk until the mixture thickens
4. Mix in cheese and salt, stirring constantly
5. Once cheese is melted thoroughly add chiles.

Beef
1/2 lb ground beef
2 TBS taco seasoning
1 tsp onion powder
1 tsp garlic powder

1. Cook ground beef in a large pan over medium heat.
2. Add seasoning to ground beef (add more or less to taste)

tortilla chips
salsa
sour cream

Nachos
1. Layer chips to cover a plate.
2. Top chips with about half of ground beef
3. Top ground beef with more more chips.
4. Cover chips with the rest of the beef.
5. Cover chips and meat with cheese.
6. Top cheese with a little salsa.
7. And a little sour cream**
8. Microwave for 30 seconds to warm in all up.


Enjoy.


** Nate made the sour cream look fancy on the nachos by using a syringe type thing, like this


These were delicious and could be doubled or so to make a delicious side dish to take to a BBQ. Perfect for summer.

Wednesday, June 22, 2011

Brown Sugar Bacon Burgers

Even back when Nate and I were dating we liked to cook food together. We would usually at least eat a couple meals a week together (I guess cause we wanted to be together as much time as possible) maybe more. One day we were experimenting a little and we discovered these delicious brown sugar bacon burgers. And let me tell you. These may be the best burgers I've ever had in my life. Sometimes I even crave them. And I crave brown sugar bacon, like no other. And they really aren't too hard to make either.

Hamburger Buns (As many buns as you want burgers)
Ground beef (we usually use .5lbs per burger, but they are huge. This time we used 1.5lbs for 4 burgers, which were a little more manageable)
Bacon (2 pieces per burger)
Brown Sugar (maybe 1 TBS per slice of bacon, I never really measure, I just go with what feels right. Don't worry, a lot of it cooks off)
cheddar cheese (optional - we like cheese, but the burger has enough great flavor with out, so might as well save a few cals, right?)
Worcestershire Sauce 
Onion Salt
Seasoning Salt
Garlic Salt
Garlic Powder

1. Make your ground beef into patties. (According to the size you want for your burgers). Note: that the burgers should be a little thick, because they get thinner as they cook, also it keeps them from drying out.
2. Season both sides of your burgers with Worcestershire, onion salt, seasoning salt, garlic salt, garlic powder to taste. (Nate is the one who does this part, he doesn't ever measure how much he puts on, he just sprinkles a bit)
3. Cook your burgers however you like (We cook ours on our mini charcoal grill, cause charcoal gives the best flavor IMO)
4. Meanwhile cook bacon in saute pan at medium low heat.
5. Cook bacon for about 1 minute on side then flip over.
6. Put about 1/2 TBS of brown sugar on each piece of bacon (Spread to cover the bacon)
7. Cook for a couple minutes on that side then flip.
8. Put another 1/2 TBS brown sugar on each piece.
9. Cook bacon until almost crispy (I ONLY like crispy bacon, but the brown sugar hardens up when it cools a little, so its perfect)
10. Burgers should cook for a few minutes on each side (Don't flatten the burgers while you're cooking, this only pushes the juices out). Burgers should be cooked to around 160 degrees.
11. The last 1 to 2 minutes of cooking the burgers is when you would add cheese.
12. Assemble burger. Take one half of your bun, top with burger. Top burger with bacon. Top bacon with lettuce or other vegetables of your choice. Put sauce of your choice on top bun piece. Close.
13. Enjoy.


As I wrote this recipe I wanted to eat one of these burgers right now.

Nate likes his burgers with fry sauce on top, I like mine with ketchup. Either way these burgers taste amazing. PLEASE make these. If you don't want to change up the routine of your traditional burgers to much then just add the brown sugar bacon. Its to die for. I seriously think I could eat some everyday and be happy (But I guess most people could do that with just any bacon). I promise this is better. Just try it. You'll thank me later.

What is your favorite burger?

Wednesday, May 18, 2011

Spaghetti with Meatballs

For a graduation gift, my parents were kind enough to buy me a pasta maker attachment for our kitchen-aid. We were pretty anxious to try it, so on Sunday we finally did, and the noodles turned out to be delicious.

We were a little nervous because our dough was extremely dry and crumbly, but we tried it anyway and after a very slow start we had a steady flow of spaghetti noodles coming out.


Marinara Sauce with Meatballs
1 can tomato sauce
1/2 TBS chopped garlic
1 TBS parsley
1/2 TBS oregano
1/2 TBS basil
1/4 tsp salt
a sprinkle of pepper 
 1/4 cup onion, chopped
12 meatballs (we used frozen meatballs from Costco)

  1. Heat meatballs in the microwave on high for 3 minutes.
  2. Meanwhile combine sauce and spices in a medium sized pan.
  3. Heat to a simmer. Simmer until sauce becomes desired thickness.
  4. Cook chopped onion in a small pan over medium heat, until slightly brown and tender.
  5. Put cooked onions and meatballs in sauce.
  6. Cook for another couple of minutes, to blend the flavors.

 Spaghetti Noodles
4 eggs
3 1/2 cup flour
1 TBS water
1 tsp salt

  1. Break eggs into a liquid measuring cup.
  2. Eggs should measure to be 7/8 of a cup. If not, add 1 tsp of water at a time until eggs are 7/8 cup. 
  3. Sift flour.
  4. Put salt and sifted flour into kitchen aid mixing bowl. 
  5. Beat with flat hook, on speed 2, as you slowly add the eggs and water.
  6. Mix for 30 seconds.
  7. Put on dough hook. 
  8. Mix on speed 2 for 2 minutes.
  9. Dough will be very very very crumbly. (If you are not using the kitchenaid pasta-extruder this might not be the recipe for you. But a good one can be found here)
  10. Knead the dough with your hands for about 2 minutes.
  11. Separate the dough into small balls (About the size of a walnut).
  12. Don't worry about the dough being crumbly and dry, the machine will still send it through.
    It starts out slow, and gets faster as the machine warms up (don't push the dough balls through, the machine will take them at the right pace)
  13. Put a couple balls in at a time. Add more when the first ones have gone into the twisty tube.
  14. Let the noodles sit for about 1 hour (We just stored them in the fridge till we were ready to make dinner)
  15. Cook noodles in boiling water, for about 3-5 minutes. (It took 4 minutes for our noodles)
  16. Drain water from noodles.


Top noodles with sauce. And enjoy!


Warning, this sauce only makes enough for 2 (maybe 3), but you'll have way more noodles than that. We dried some of the noodles (and are saving them for later) and we still cooked too much. But if you're making this for more people remember that the fresh noodles will weigh more than dried noodles would (because they aren't DRIED, and have liquid in them still). So try judging more on space that the noodles take to guess how many you should cook. Also, you can always make more sauce by doubling or tripling the recipe depending on how many people.

Monday, April 4, 2011

Dutch Oven Enchilada Casserole

 We've become pretty good cooks because we are trying one to two to three new meals every week. I think cooking well, just depends on knowing how to mix ingredients together, and maybe adding a thing or two, to make something taste the way you like it. 

One of our favorite TV shows is Chopped and maybe that's helped us a little to be creative. Of course we're not pro dicers, or slicers or anything. But we enjoy it. And that's what matters.

This meal turned out delicious. I had a meal similar to this at a Relief Society activity, where they taught us about dutch ovens. Ever since then I've wanted a dutch oven, and like I said before, we just got one. I do have to say, our enchiladas tasted much better than the ones I had at the RS activity. I think because they had more meat and less sauce. Anyway, we'll definitely be making this one again.
 
1 1/2 lbs. ground beef
1 tsp. Salt
1 TBS chopped garlic
1 can (10 oz.) tomato soup
2 cans (10 oz. each) red enchilada mild sauce
1 can water (10 oz.)
6 large tortillas
2 cup shredded cheddar cheese
 
1. Brown the ground beef with salt and garlic in a pan(You could also add onion, if you like)
2. Add tomato soup, enchilada sauce and water.
3. Simmer for 5 minutes.
4. Pour 1/4 of mixture into dutch oven.
5. Tear tortillas into pieces, and place 2 tortillas on top of the mixture.
6. Pour another 1/4 of mixture on top of tortillas.
7. Sprinkle with 1 cup of cheese.
8. Add another layer of 2 tortillas.
9. Pour another 1/4 of mixture on top.
10. Add another layer of 2 tortillas.
11. Pour the rest of the meat mixture on top.
12. Sprinkle the remaining 1 cup of cheese over mixture.
13. Cover with the lid and briquettes.
14. Cook for 15-20 minutes. 

Friday, March 25, 2011

Beef Fajitas

We had these on the menu, and bought the beef for them (We used the same beef as we used for the gyros, and it worked perfectly for both). I didn't really know how to season the beef, because I usually make chicken fajitas instead of beef. I just threw a few spices on, and it turned out great.


1/2 lb sliced beef
1/2 red pepper, sliced
1/2 yellow pepper, sliced
1/2 onion, sliced
1/2 TBS cumin
1/2 TBS chili powder
2 TBS salsa
salt (to taste)
1 1/2 TBS chopped garlic
2 TBS lemon juice

**uncooked tortillas.

1. Mix together cumin, chili powder, salsa, salt, garlic and lemon juice
2. Put mix and meat in a pan. Cook a few minutes until meat has almost no red.
3. Add vegetables and cook for a couple minutes until meat and vegetables are tender.
4. Meanwhile, cook tortillas on a griddle, till they have a few brown spots on each side.
5. Top tortillas with some delicious beef, vegetables and your favorite toppings of cheese, sour cream or salsa.

Enjoy.

** We tried uncooked tortillas a few months ago, and we haven't been able to go back to regular tortillas ever since. They taste so much better, so fresh and warm. Yum!

Monday, March 21, 2011

Beef Gyros

The first time Nate and I were talking about gyros, he told me that his friends (who were from Greece) pronounced it ji-ros, and that that was the correct way to say it. I told him he was wrong and that it was pronounced like yuros. Yesterday when he wrote it on our menu he wrote "euros" so I think that means my pronunciation is corrected. Also, it probably means he was lying to me before.

Meat
2 lb boneless beef chuck steak (we just got steak that was already sliced about 1/4 inch thick or so and probably less than a pound)

1/4 cup olive oil
2 TBS lemon juice
1 TBS minced garlic
1 tsp dried oregano
1/2 tsp salt
1/4 tsp pepper

Yogurt-Dill Sauce
1 cup plain greek yogurt
1 cup diced seedless cucumber
1 TBS dill
1/4 tsp salt

Pita bread
Toppings: lettuce, tomatoes, onions, etc.

1. Place beef in slow cooker.
2. Mix oil, lemon juice, garlic, oregano, salt and pepper in a small bowl.
3. Pour over beef, turning beef to coat.
4. Cover and cook on low for 4 to 6 hours (until meat is tender)
5. Make sauce by stirring together ingredients.
6. Warm pitas as package directs.
7. Top pitas with sliced meat, yogurt sauce and toppings.


These turned out to be delicious, and its such an easy recipe. I love being able to throw something in the crock pot in the morning, and to come home to a delicious smelling kitchen when I get home from work. The sliced beef we used for this was absolutely perfect! (If you're going to use a whole roast, you probably need to cook it about 1-2 hours longer than I suggested). We'll definitely be making this again. Maybe we'll try it with lamb next time.

Monday, March 7, 2011

Chili

 This was my first time making chili on my own and it turned out pretty good. I only cooked it in the crock pot for a couple hours and it was alright (Though maybe you would only need 1 can of tomato sauce if you left it in all day, because it gets liquidy from the steam.). Also, if you're going to cook it for a short time in the crock pot, make sure to cook your onions with your ground beef because they tasted a little raw to me. 

We had this with a delicious side of corn bread. Because for me, corn bread and chili are a perfect combo.

1 lb ground beef
2 garlic cloves 
1/2 tsp pepper
1 tsp salt
1 can kidney beans (drained)
1 can pinto beans (drained)
2 small cans tomato sauce
1 can stewed tomatoes
1 cup onion, diced (I used 1 small onion)
1/2 cup green pepper, diced (I used a whole green pepper)
2 TBS chili powder
1 tsp cumin
1 tsp parsley
1 tsp basil
1/2 tsp oregano
1 dash worshestershire sauce


1.Brown ground beef in garlic.
2. Put everything in crockpot
3. Cover and cook on low for 6-8 hours (or on high for 4-5)*


4. Top with some cheese, sour cream and fritos.


** You could also cook this in a stock pot for 1.5 hours to avoid the raw onion taste, and everything would come together nicely.

Friday, March 4, 2011

Shredded Beef Chimichangas

I got this recipe from one of my favorite cooking blogs, For the Love of Cooking. And I seriously feel like this is one of the best meals I have ever made! This beef shredded so perfectly after being in the crock pot all day, and tasted so delicious. I will definitely be making this again (and maybe soon).

Do you know the difference of a burrito and a chimichanga? A chimichanga is basically a burrito that is deep fried. Except we baked them, to avoid the excess fat. But we got the same results, a delicious crispy tortilla with some delicious moist meat inside.

These can be topped with any of your favorite things, we used sour cream and salsa, but lettuce, cilantro, pico de gallo, etc. would also be delicious.


1 1/2 lbs round roast (I'm not sure what kind of roast I used, it was just what we had in the freezer -- also, I probably only used 1 lb)
7 oz can of whole green chiles
1 TBS chili powder
1 tsp salt
1/2 tsp pepper
1 tsp cumin
1 tsp oregano
2-3 cloves of chopped garlic
1-2 cups beef broth
1 sweet yellow onion, sliced (the one who got was huge, so I only used about 1/2)
1 tsp olive oil
salt and pepper to taste
flour tortillas
shredded cheddar cheese (we used a combination of cheddar and mozarella, cause its what we had)

1. Put roast, chiles, chili powder, salt, pepper, cumin, , oregano, garlic, and beef broth in crock pot.
2. Cook on low for at least 6 hours (I left it in for probably 8 or 9 hours with no problems)
3. Pre-heat oven to 400 degrees
4. Cook onions in saute pan with olive oil and a little salt and pepper, about 15 minutes, until soft.
5. Line a baking sheet with tin foil and spray with cooking spray.
6. Lay one tortilla on a plate.
7. Add a layer of cheese, then a spoonful or beef (with liquid drained), then a spoonful of onions.
8. Fold the end in and roll it up.
**9. Bake on sheet for 7- 10 minutes on each side.

** We pressed them in our panini press for a couple minutes first, so that they would hold their shape. And only baked them bout 5 minutes on each side.


Related Posts Plugin for WordPress, Blogger...